I have been shooting portraits on location with a single speedlite for many years. When travelling overseas or by public transport in this country it’s not always possible to carry too much lighting gear. You also have to consider the lighting setting up time if you are using several speedlites.
ON-CAMERA SPEEDLITE
Here is an image we took of our beautiful model Phoebe at the Members’ Evening using on-camera flash:
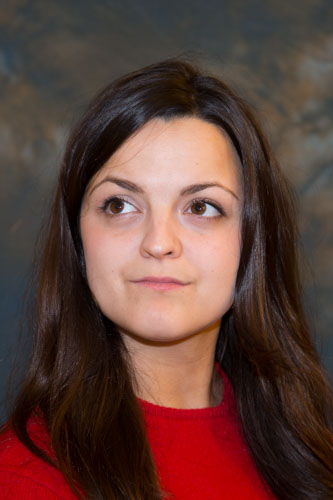
The light in this image is harsh and flat. It also has a nasty shadow of her chin. Shadows are the soul of a portrait. Once you remove the flash from the camera and trigger it remotely it begins to give your portraits a three dimensional quality. There are various ways of trigger the remote flash:
1. Speedlite on a long pc lead
2. Remote speedlite fired with optical slave cells
3. Downside of optical slave at an event where there are other flash users e.g. at a social event
4. Nikon’s CLS system: 2x Nikon SB800 or Remote commander SU-800 (infrared)
5. Canon’s STE-2: Remote commander (infrared)
6. Wireless triggering using devices such as PocketWizard – most reliable
OFF-CAMERA SPEEDLITE
Here is an image with the off-camera flash. The camera used is Canon 40D fitted with Canon STE-2 that triggered the Canon 430EXII speedlite using infrared.
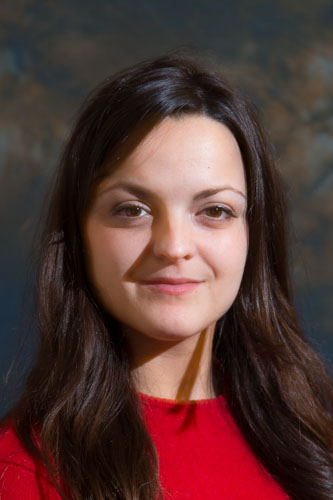
The above image is better as it has a three dimensional quality to it. However, the shadows are quite harsh.
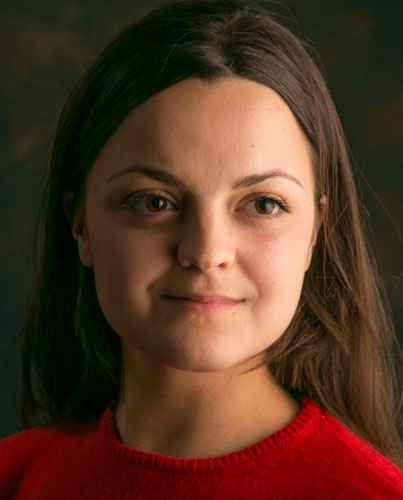
SPEEDLITE THROUGH A TRANSLUCENT BROLLY
In this image the flash is directed towards a white brolly. This makes the light source bigger, softening the shadows. Notice also the catchlight in the eyes which are missing in the previous image.

You need the following kit to get started:
1. Brolly clamp from Viewfinder Photography
2. Manfrotto lighting stand, also from Amazon
3. Westcott 36″ optical white satin shoot through brolly from WEX Photographic
CANON USERS: Canon STE-2 infrared commander, Canon speedlite that has enough power e.g Canon 430EX II.
NIKON USERS: SU-800 Commander, SB-600 or higher GN speedlite.
The great thing is that the above system is simple and it works (most of the time). I say most of the time because the speedlite infrared sensor must be pointing towards the infrared commander to receive the signal. This isn’t always possible, especially if you are shooting in a large area.
ADVANCED LIGHTING FOR PORTRAITURE
THE MYSTERY OF LIGHT
Understanding how light affects the shape, texture and form is vital for portrait photography. The size of the light source in relation to your subject and its distance from your subject determines the softness or the edginess of your light. The bigger the light source closer to your subject the softer the light. A big light source positioned further away from your subject will begin to act like a small source, resulting in harsher light. The sun is the biggest light source in our solar system, yet because of its long distance from earth it acts like a point source, resulting in hard shadows.
There are five basic lighting patterns that are most commonly used: These are achieved by rotation of the key light in relation to your subject –
Butterfly lighting, loop lighting, Rembrandt lighting, split lighting and profile lighting
Bill Hurter is a great portrait photographer. You might find this article useful to read.
To make a great portrait you need three light levels:
1. Highlights
2. Shadows
3. Natural skin tone
A creative artist can only control and create the first two as the natural skin tone of your subject is given and must be reproduced faithfully. On the club evening I used a 135cm Octabox on Bowens Sprit 80 studio flash to create soft light. This was to simulate the soft window light. In the image below the model has beautiful skin tone and shadows but is missing highlights.
In the image below the highlights on the model’s hair were achieved by a using an Elinchrom Quadra Ranger fitted with a beauty dish as we were running late. This was not the right light modifier. A rectangular soft box was needed to control highlights.

This image displays a complete tonal range and works well. However, more work was needed in this image by moving the big octabox sideways to create the Rembrandt lighting but the time didn’t permit it. Maybe next time…
Photo by: Trevor Walker

Hi Nishi
I watched with interest on Wednesday night. I found it fascinating on how to create the five different light patterns and the effect it had. I wanted to thank you so much for taking the time to do this. It was very helpful for us newer members that are just starting out on a Journey with Photography and are maybe not quite sure what type of Photography they want to do, so far I have only dabbled in Landscape. This may open up a whole new interest (and expense)
Kind regards
Sharon.
Thank you Sharon for your feedback. I am really encouraged that you found the evening helpful. The study of light and shadows and how they interact with each other is absolutely fascinating and works of great portrait photographers like Yousuf Karsh, who had mastered it, continue to inspire me. Many thanks again for your comments.
What an illuminating evening!! (What a lot of hard work for Nishi – and a lot of clearing up afterwards!)
An extremely interesting and helpful demonstration which has certainly inspired me to try much harder with off camera flash. Also, thanks for the invaluable info. supplied above which will provide a good reference guide. Lovely set of photos taken under less than ideal conditions show what great images can be produced – with the right knowledge and equipment.
Also – loved the Michael and Nishi double act; Panto season started early at CCC!
Thank you Chris for your kind words. I am really encouraged that you found the evening inspirational. A big thank you to you to you also for staying behind afterwards to help me pack.