How do I submit my digital images for a PDI competition?
Please email your images to cheampdi@gmail.com
PDIs of PRINTS are to go to Kevin at his own address of kaustii@aol.com. These should be sent in the same email as the titles for the print competition they relate to.
How large should the images be?
The images can be up to 1600 pixels wide, and up to 1200 pixels tall, including keylines and borders. This would include perhaps a landscape of 1600×800, a portrait of 1200×800, or a square of 1200×1200.
The images should be saved in JPG format, with an SRGB colour profile.
How many images can I submit for a PDI competition?
Up to TWO images may be entered. Images must be in JPEG format.
What's the deadline for submitting my PDIs?
Entry cut off time Monday 8.00pm on week of competition.
Do I need to rename my images?
Please put them in a folder that is titled with your first and last names, for example: c:\temp\joe soap\
The image titles must start with a sequence number (containing three digits as exampled below) followed by a space then the image title. They should therefore look like this:
001 A foggy day in London
002 A sunny day in London
(note: do not include your name in the title of image files)
Image preparation when using Adobe Photoshop CS2/3/4/5
To prepare your images to the correct size for projection on the Club’s computer, which uses DiCentra software, follow the process below. Images must be sized to fit within an area 1600 pixels wide and 1200 pixels high.
• Open Photoshop and duplicate your images. This is to protect your original image as you will be downsizing it. Then edit your image as required. When editing is completed, and with the image still open, flatten any layers if you have created layers.

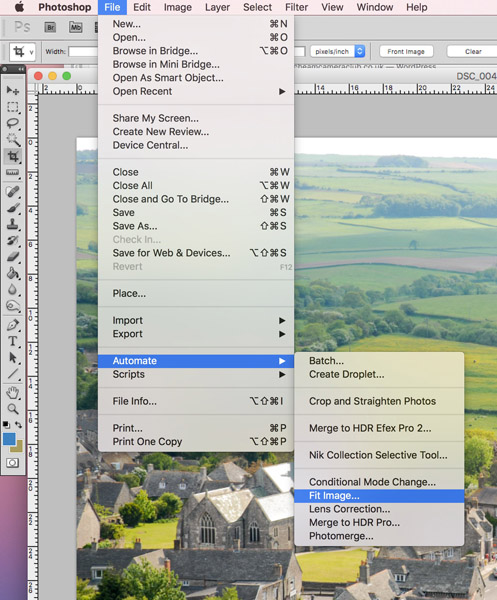
• Go to >File>Automate>Fit image, and type in 1600 pixels for the width and 1200 pixels for the height.
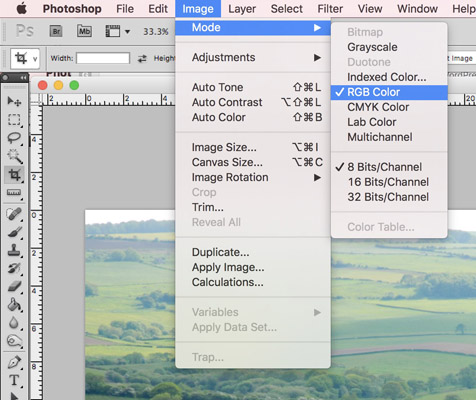
• Go to >Image>Mode>Convert to profile and convert the image to sRGB working space.
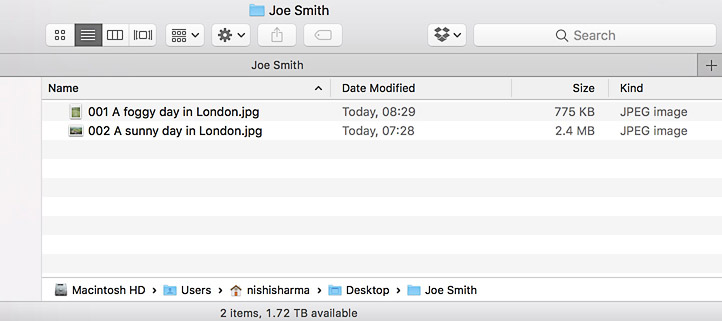
• Create a folder which must be titled using your entrant’s name. Save your images (up to two permitted) into this folder.
The image titles must start with a sequence number (containing 3 digits as exampled below) followed a space then the image title. They should therefore look like this:
001 A foggy day in London
002 A sunny day in London
To save to a new file: go to FILE > SAVE AS to save the image to the required file name in JPEG format with a quality setting of 10 or 12.
Image preparation when using Adobe Photoshop Lightroom
There is no is ‘save’ command in Lightroom, so in order to get your image to the size required for competition. Images must be sized to fit within an area 1600 pixels wide and 1200 pixels high. You should edit your image and, when editing is completed, export your image to your hard drive.
- Go to >File>Export. This opens a window with nine headings or windows. You will need only four of these windows, namely Export Location, File Naming, File Settings and Image Sizing.
- Go to Export Location: where it says Export To: select ‘Specific Folder’, then select ‘Choose’—this will open the Finder window on a Mac and the Explorer window on Windows.
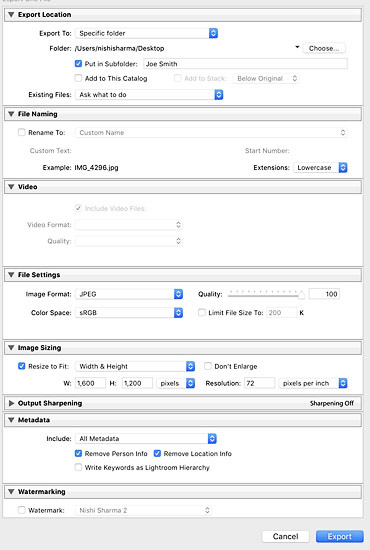
- You may prefer to export to the desktop at this point and file away later, select Choose/Open in the Finder or Explorer window, this then takes you back to the Export window. Where it says Existing Files select ‘Choose a new name for the exported file’.
- Now move onto the File Naming window: tick ‘Rename To’ and select ‘Custom Name’. At ‘Custom Text’ type in your image file name, such as ‘001 A foggy day in London’.

- Now move onto the File Settings window: in ‘Image Format’ select ‘JPEG’ and at ‘Colour Space’ select ‘sRGB’. Quality should be set to 100. ‘Limit file size’ should be UNTICKED.
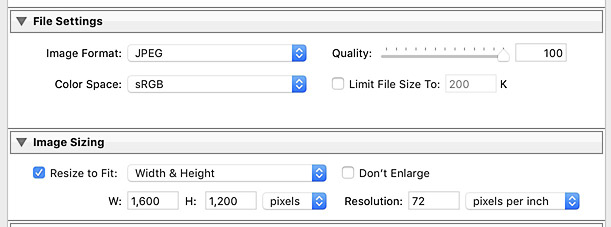
- Now move onto the final window Image Sizing: tick ‘Resize to Fit’ and select ‘Width & Height’, at W: 1600 at H: 1200, select pixels and set resolution to 72 pixels per inch. Now select ‘Export’. Your image will now appear on your desktop ready sized for emailing or saving to media.
- This is what your folder should look like:
Image Preparation when using Adobe Photoshop Elements
There might be some variation in the menu of your Photoshop Elements depending on the version but the basic method remains the same.Images must be sized to fit within an area 1600 pixels wide and 1200 pixels high.
- Open an image.
- Duplicate the image (IMAGE/DUPLICATE).
- Close the original image.
- Flatten all layers (LAYERS/FLATTEN IMAGE).
- Resize the image. There are two ways to do this:
- Quick resize image: FILE/AUTOMATE/FIT IMAGE
- Constrain using 1600 pixels by 1200 pixels.
- OK.
- Alternative image resize: IMAGE/Image Size
- Tick ‘Constrain proportions’
- Tick ‘Bicubic’
- Type in 1600 pixels in the box with the largest number of pixels
- Resolution 72 DPI
- Click OK.
- 6 Set/convert colour profile to ‘sRGB’.
- Always CONVERT to profile (‘ASSIGN PROFILE’ leads to unexpected results).
- EDIT/CONVERT TO PROFILE
- Destination space (drop down menu, choose ‘sRGB’).
- Save your file(s)—FILE /SAVE AS using the following settings
Image Options/Quality/12 (maximum)
Format Options/Tick ‘Baseline Standard’ - File naming should take the form of a sequence number (containing three digits as exampled below) followed by a space then the image title, for example:001 The red robin
002 Sunlight at dawn
(note: do not include your name in the title of image files) - If you are submitting via CD or USB please create a named folder using your first and last names, for example: c:\temp\Joe Smith\
- Then save your numbered images files inside this folder:
Recent Comments